Two tabs: Overview and Health
A profile has two tabs across the top.- Overview is about how the asset is set up — its weight ratings, its empty weight, how loaded it is against those limits, its tyres, and where it stores cargo.
- Health is about its condition over time — when it is next due for a service, the age of its tyres, and its warranty cover.

The Overview tab, top to bottom
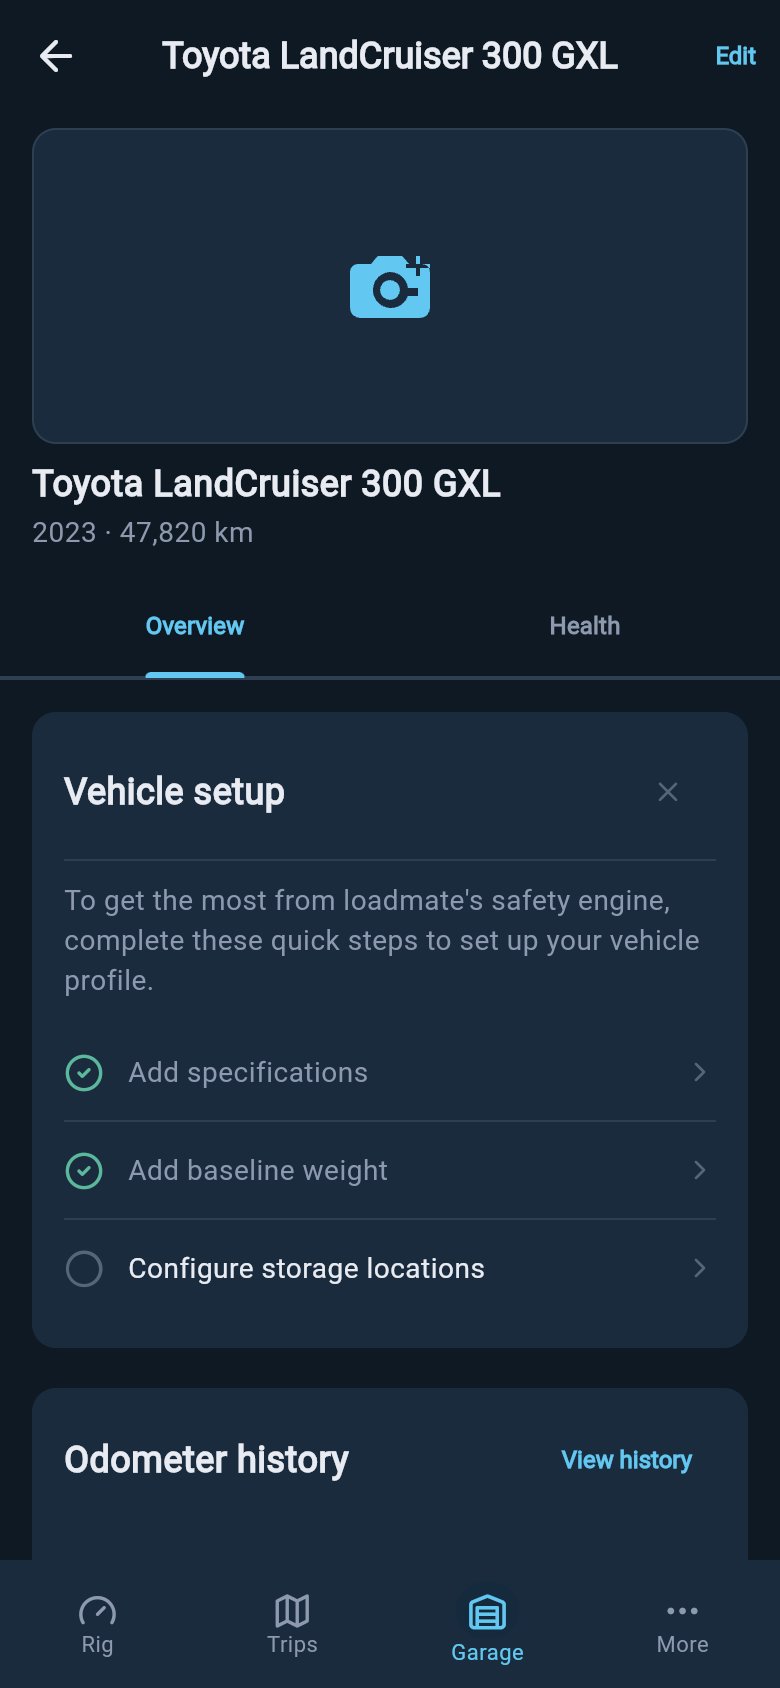
The setup checklist comes first
The very first time you open a new asset, the top of Overview shows a Vehicle setup (or Trailer setup) card — a short checklist of what is still missing. It is one consolidated card, not a scatter of separate prompts, so you see your remaining steps as a single tidy list in order:- Add specifications — the weight ratings printed on the asset’s compliance plate.
- Add baseline weight — what the asset weighs empty.
- Configure storage locations — the zones where you load cargo.
loadmate needs these three pieces to judge your rig honestly. The ratings tell it your limits, the baseline tells it your starting weight, and the storage zones let it work out where your load sits. Until they are in, your safety score and compliance figures are working from less than the full picture — which is why the checklist nudges you toward them.
The Compliance limits card
Once your specifications are in, a Compliance limits card appears. This is simply a clear list of the maximum weights your asset is rated for — the numbers off its plate, laid out so you can read them without squinting at the sticker. For a tow vehicle the card groups its towing limits (your combined-rig limit, the most a braked trailer can weigh, and the maximum load on the tow ball) above the vehicle’s own limits (its loaded-vehicle limit and each axle’s limit). For a caravan it shows the trailer’s limits (its loaded limit, its axle-group limit, and the load it puts down on the coupling). The exact names depend on where you are. Your loaded-vehicle limit is called GVM in Australia, MAM in the UK, and GVWR in the US and Europe/international; your combined-rig limit is GCM, GTW, or GCWR; your caravan’s loaded limit is ATM, MTPLM, Trailer GVWR, or GTWR. loadmate shows whichever names match your region automatically, so the card always reads in the terms you know.The Baseline weight card
Below the limits sits the Baseline weight card — what your asset weighs empty, before you load anything in. It shows the total at the top with a small badge telling you where the figure came from: Weighed if you put it on a weighbridge, or a factory/spec figure if it came from the book. A weighed figure is the more trustworthy of the two, and the badge colour reflects that. Underneath, the card breaks the weight down — front and rear axle for a vehicle, coupling load and axle group for a caravan — so you can see how the empty weight is spread. This is the foundation every load calculation builds on, which is why it earns its own card.The Compliance summary card and what the bars mean
The Compliance summary card is where loadmate compares what your rig actually weighs against each of those limits. Every limit gets a bar and a percentage. The percentage is how much of that limit you are using right now: 70% means you have headroom, 100% means you are at the line, and anything over reads in red because you are above the rating. The bars change colour as they fill — green while you have comfortable room, amber as you get close, red once you are at or over the limit. So a quick scan tells you whether your rig is sitting safely or asking for attention, without you doing any arithmetic. The figures here are quiet on purpose until there is something real to weigh. Before you have entered your specs or added any load, the card has nothing to show: on a tow vehicle it stays hidden altogether, and on a caravan it shows a short “nothing to compare yet” message in place of bars. That is not the app being broken — it simply has nothing to measure yet. As you add your ratings, your baseline, and your loads, the bars fill in and start telling you something. A quiet or absent compliance card means “not enough entered yet”, not “all clear”.On a tow vehicle, the combined-rig and tow-ball bars only appear while the vehicle is actually hitched to a trailer in your current setup. Unhitched, those limits do not apply, so loadmate leaves them out rather than show you a number that has no meaning right now.
Tap a bar for the full detail (tow vehicles)
On a tow vehicle, tap any compliance bar to open a detail sheet that lays the same number out in full. It explains what that limit is, then shows three lines: Calculated (what your rig weighs against it), Limit (the maximum), and Used (the percentage), with a larger bar beneath. It is the unhurried version of the summary row — useful when a bar is amber or red and you want to understand exactly how much room is left before you start shifting gear around. On a caravan the compliance bars are read-only: they show you the same figure and colour at a glance, but they do not open a detail sheet. The numbers and what they mean are the same; there is just nothing extra to tap through to.Tyres and storage
Further down Overview you will find your Tyres section — a single summary of the rig’s tyres showing their age, rating, and how much load capacity is spare — and your storage section, which lists the zones you have set up for cargo and how many there are. Both are summaries here; you tap through to add or change the detail. Setting up storage zones has its own page, linked below, because getting your zones right is what lets loadmate work out where your load actually sits.The Odometer history card
If you have set up the service module under Health, an Odometer history card appears on Overview too, showing your recent distance readings. Until the service module is set up there is nothing for it to show, so it stays hidden — it only turns up once it is useful.Quick links at the bottom
The bottom of every Overview is a short list of Quick links — the handful of jobs you come back to most, gathered in one place so you do not have to remember which screen each lives on. On a tow vehicle they are: edit specifications, edit baseline weight, and manage storage locations. A caravan has the same three plus two more: WDH settings, and an Update ball weight action. That last one opens a measurement tool for the load your van is putting down on the tow ball right now — it is kept here, separate from the baseline card, because baseline is your van’s empty starting weight while the ball-weight measurement is about the loaded rig. Like the limit names, this action is labelled for your region: it reads Update tow ball mass in Australia, Update nose weight in the UK, and Update tongue weight in the US.The WDH card (caravans only)
If your caravan uses a weight-distribution hitch and you have set it up, a WDH card appears on the trailer’s Overview. It shows which mode the hitch is in and, when the van is actually hitched to a tow vehicle, how much weight the hitch is shifting — adding load back onto the tow vehicle’s front axle, taking it off the rear, and putting some onto the van’s own axles. When the van is not hitched, those figures show a dash, because the effect only exists with the two connected. Most caravanners do not use a weight-distribution hitch, so this card simply will not appear unless you have one set up. If you do, see Set up a weight distribution hitch for how to record it and read its effect.The Health tab: condition, not setup
The Health tab answers a different question from Overview. Overview asks “is this asset set up correctly?”; Health asks “how is it doing, and what is coming up?”. It is the same maintenance view you would see in the maintenance hub, brought onto the profile so you can check an asset’s condition without leaving it. At the top sit three quick actions — Update odometer, Log service, and Add task — for the jobs you do most. Below them, an Upcoming card lists anything due soon or overdue across services, tasks, and warranty expiry, with the most urgent first, so one glance tells you whether anything needs doing. Under that, up to three module rows summarise Service, Tyres, and Warranty, each showing its current state and tapping through to the full module. The Tyres row only appears when tyre tracking is switched on for that asset, so on a rig with tyres turned off you will see just the Service and Warranty rows. It is worth being clear how this differs from the Overview setup checklist. The checklist is about setup-completeness — have you entered your ratings, baseline, and storage. Health is about ongoing condition — is a service due, are the tyres ageing, is a warranty about to lapse. A rig can be fully set up on Overview and still have an overdue service flagged on Health; the two are not measuring the same thing. The Warranty row on Health opens the main warranty hub directly, the same place you reach from the More tab. It reflects your coverage — how many warranties are active and the nearest expiry — and tapping it lands you straight in the hub rather than bouncing you sideways through another menu.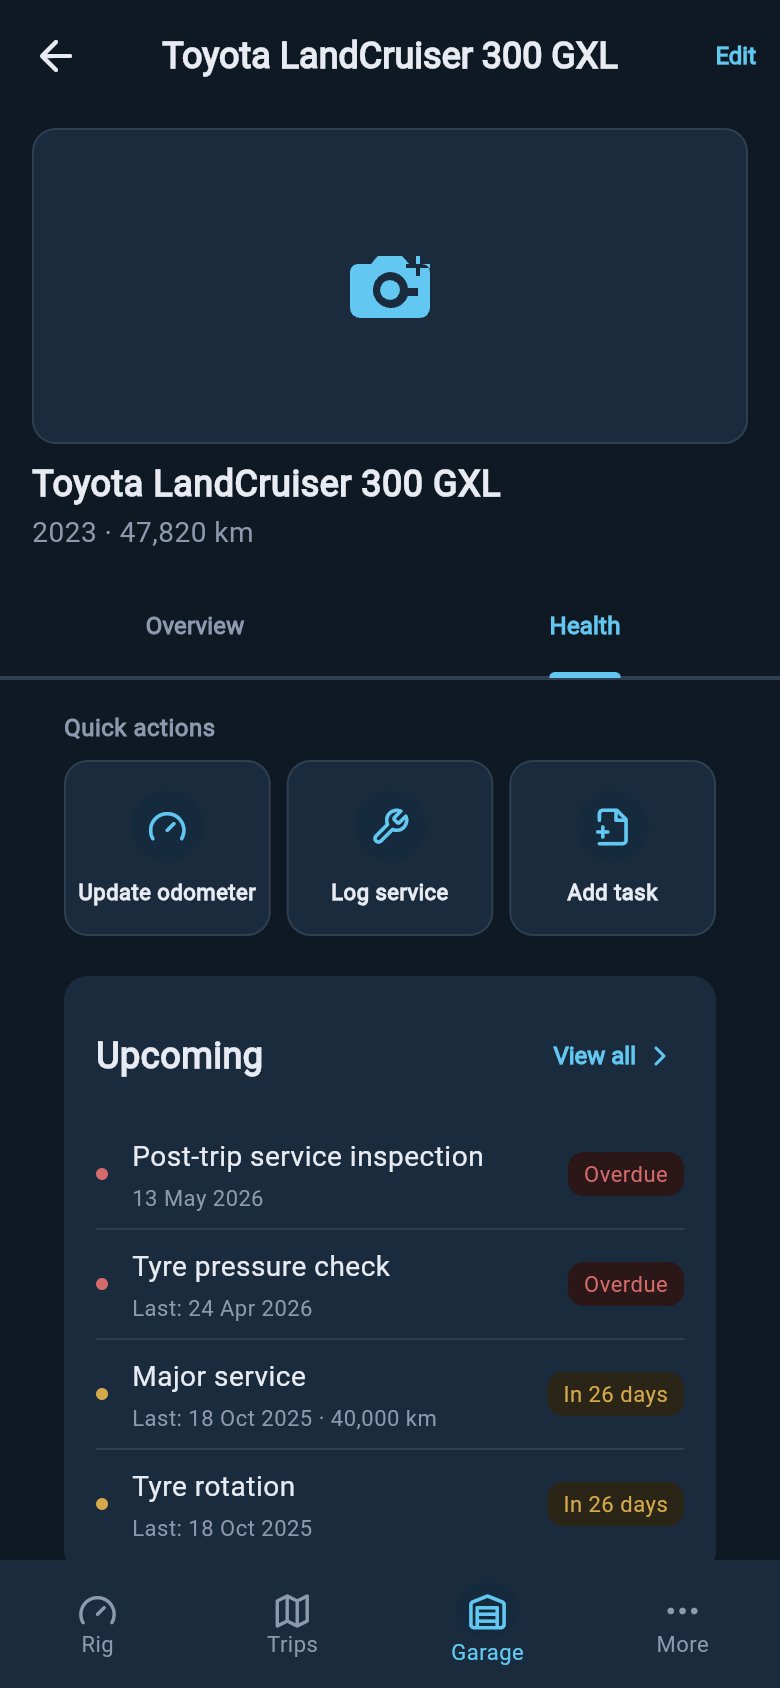
Where to go next
The profile is the map; these pages are the jobs it points you to.Edit ratings and specifications
Enter or correct the weight limits from your asset’s compliance plate so the limits and compliance cards read true.
Set up storage zones
Define where you load cargo so loadmate can work out where your weight actually sits.
Compliance snapshot
See how your whole rig sits against every limit at once, including the combined-rig figures that come alive when a van is hitched.
Service records
Open the full maintenance view behind the Health tab to log services and keep your schedule honest.