Saving any load to your own rig requires Pro. Demo data stays read-only, so you can look around the demo rig without changing anything.
Open the load list
On the Rig tab, tap your Capacity card, then tap manage loads. From there you can open the full list to see and manage everything on the rig in one place. When a rig has no loads yet, this is where the empty state appears with an action to add your first item. Tap the add button to open the Add item sheet. Its subtitle reads “Choose how to add items to your rig”, and it offers the five methods below.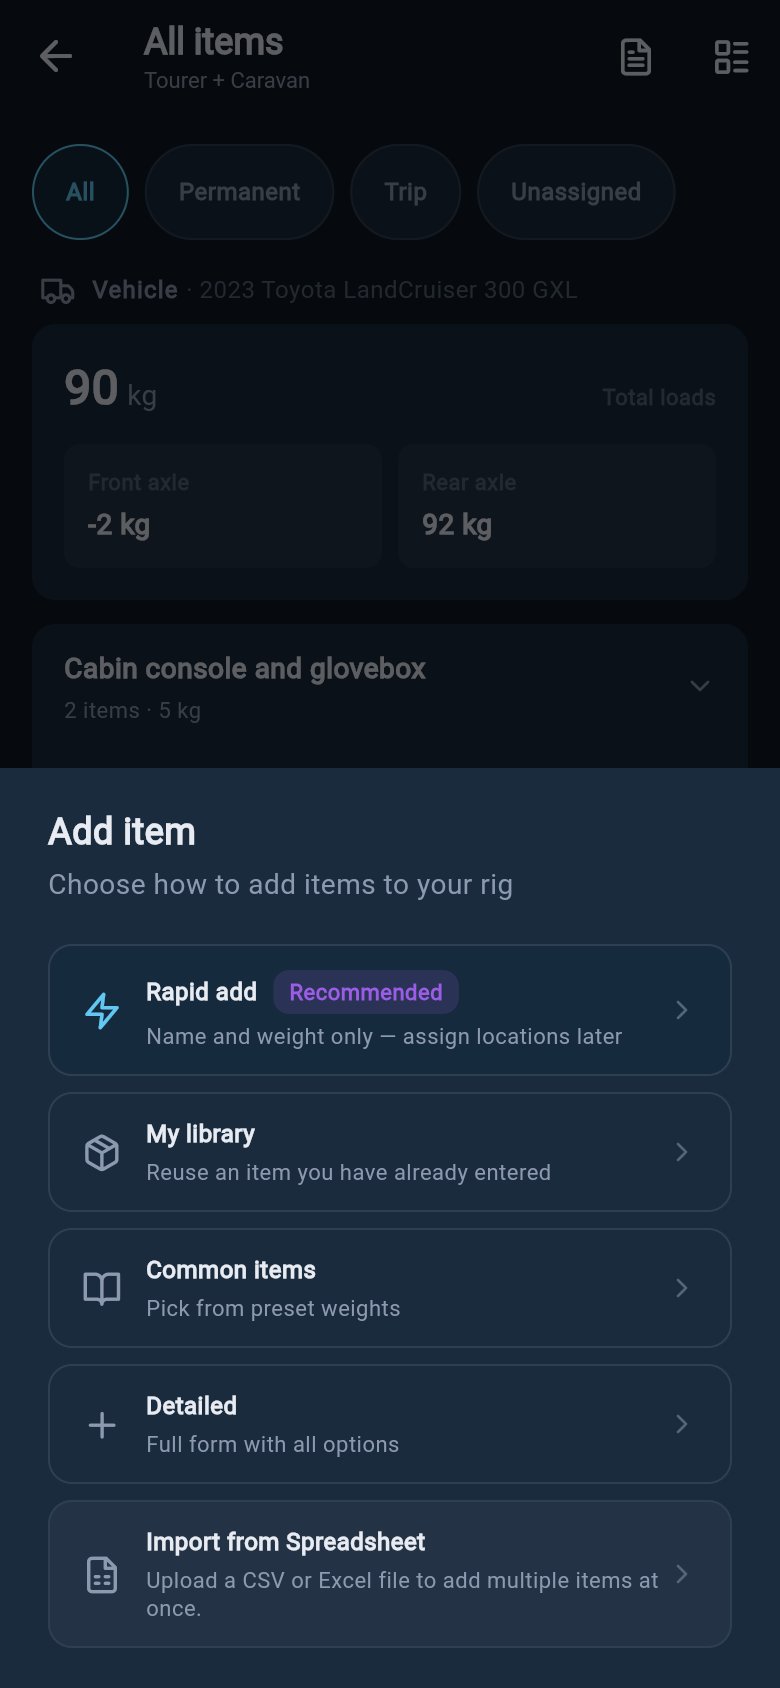
Which method should I use?
Each method suits a different moment. The five cards below are the methods in the Add item sheet; each has its own section further down the page.Rapid add
Best for getting a batch of items in fast, with just a name and weight.
My library
Best for reusing an item you have already saved on a rig.
Common items
Best for picking from a preset catalogue when you are not sure of weights.
Detailed
Best for full control over one item, including consumables.
Import from a spreadsheet
Best for adding many items at once from a CSV or Excel file.
| Method | Best for | Speed | Sets a zone? | Sets consumables? |
|---|---|---|---|---|
| Rapid add | Adding a batch of items quickly with just a name and weight | Fastest | No — items land unassigned | No |
| My library | Reusing an item you have already saved on a rig | Fast | Yes, in the form | Yes, in the form |
| Common items | Picking from a preset catalogue when you are not sure of weights | Fast | No — items land unassigned | Set later in the app |
| Detailed | Full control over one item, including consumables | Slower | Yes | Yes |
| Import from a spreadsheet | Adding many items at once from a CSV or Excel file | Bulk | From the file, where the location matches a zone | No — set in the app afterwards |
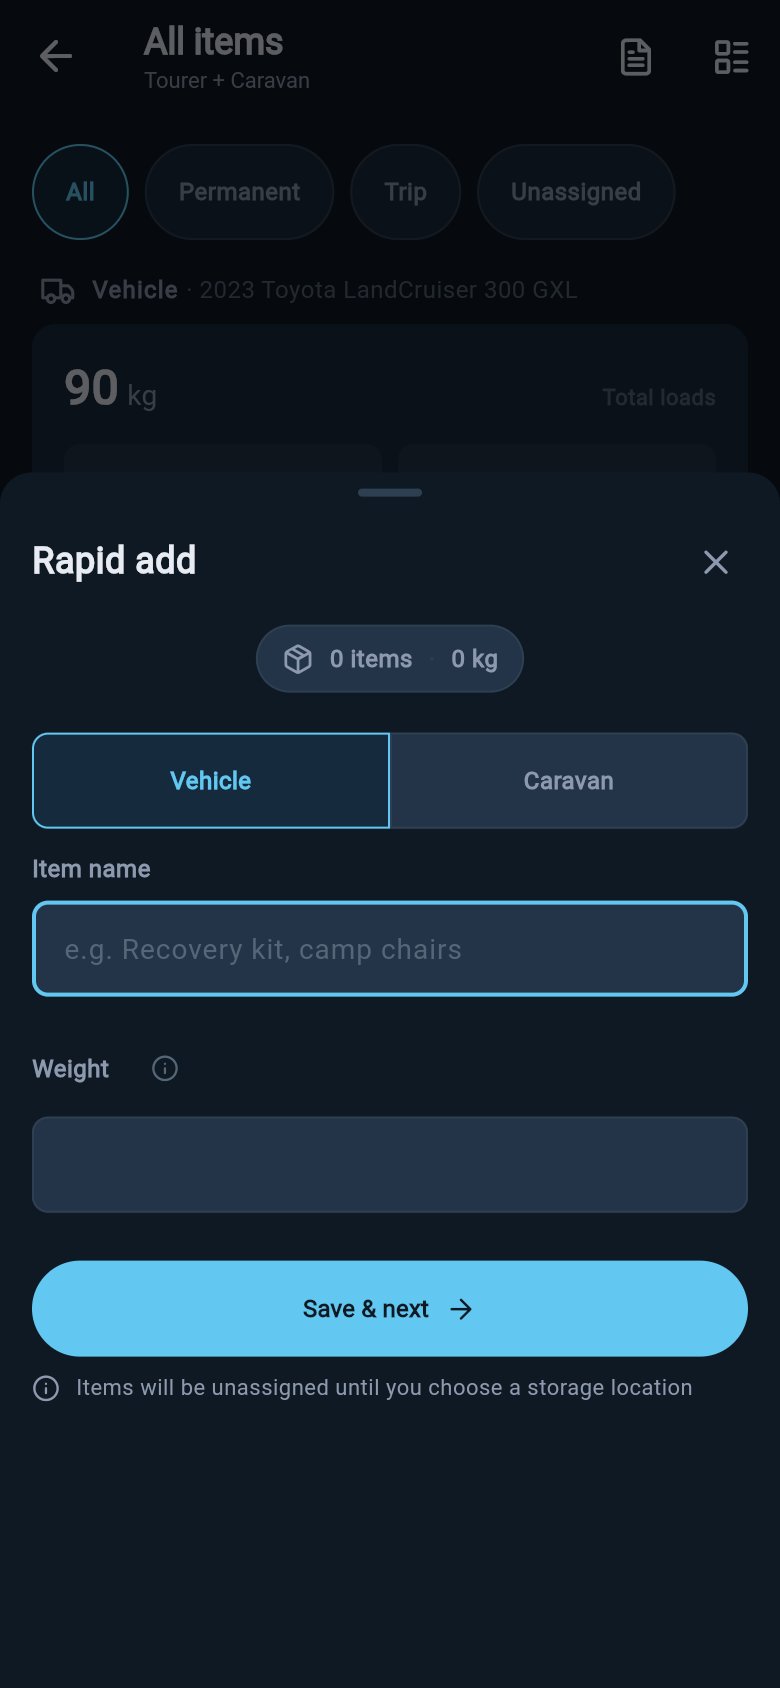
Rapid add
Rapid add carries the Recommended badge because it is the quickest way to get a holiday’s worth of gear into loadmate. You enter only a name and a weight, then tap Save & next. The form clears and puts the cursor back on the name field so you can keep going without lifting your hands off the keyboard. A running counter at the top shows how many items you have added and their total weight. Items added this way are created unassigned to any zone, and their weight is recorded as a manual entry. You assign each item to a storage zone later from your loads list, once you know where it actually sits.Pick the vehicle or trailer
If your rig is hitched, choose whether the item sits on the vehicle or the trailer.
Estimates are fine in rapid add — you can refine any weight later. Do not leave heavy gear out just because the number is not exact.
My library
My library reuses an item you have already entered on any rig. loadmate keeps a personal catalogue of your saved items, so a “rear drawers” or “generator” you set up once is ready to drop onto another rig. Selecting an item from My library opens the detailed form pre-filled with that item’s name, weight, weight source, and category. You can adjust anything before you save, and you choose the asset and zone in the form. This makes it the fast path for repeat gear that you still want to place precisely. If your library is empty, add a few items to any rig first — every item you save appears in your library for next time. For more on which details travel with a saved item and which are specific to the trip, see Load library.Common items
Common items is a searchable preset catalogue, grouped into categories such as Recovery Gear, Kitchen & Dining, and Water & Sanitation. You can search by name, filter by category, and tick as many items as you need. The footer shows the selected count and total weight, and a single Add all button drops every ticked item onto your rig at once. When your rig is hitched, Add all shows whether the items are going to the vehicle or the trailer. The weights shown are typical values — a starting point, not a measurement. After adding, open each item and confirm the real weight when you can, so your safety scores reflect your actual gear. Items added from Common items land unassigned, so assign them to zones afterwards from your loads list.Detailed
The Detailed path opens the full Add item form. It gives you every option for a single item, including consumables, attachments, and the toggles that change how the item is treated.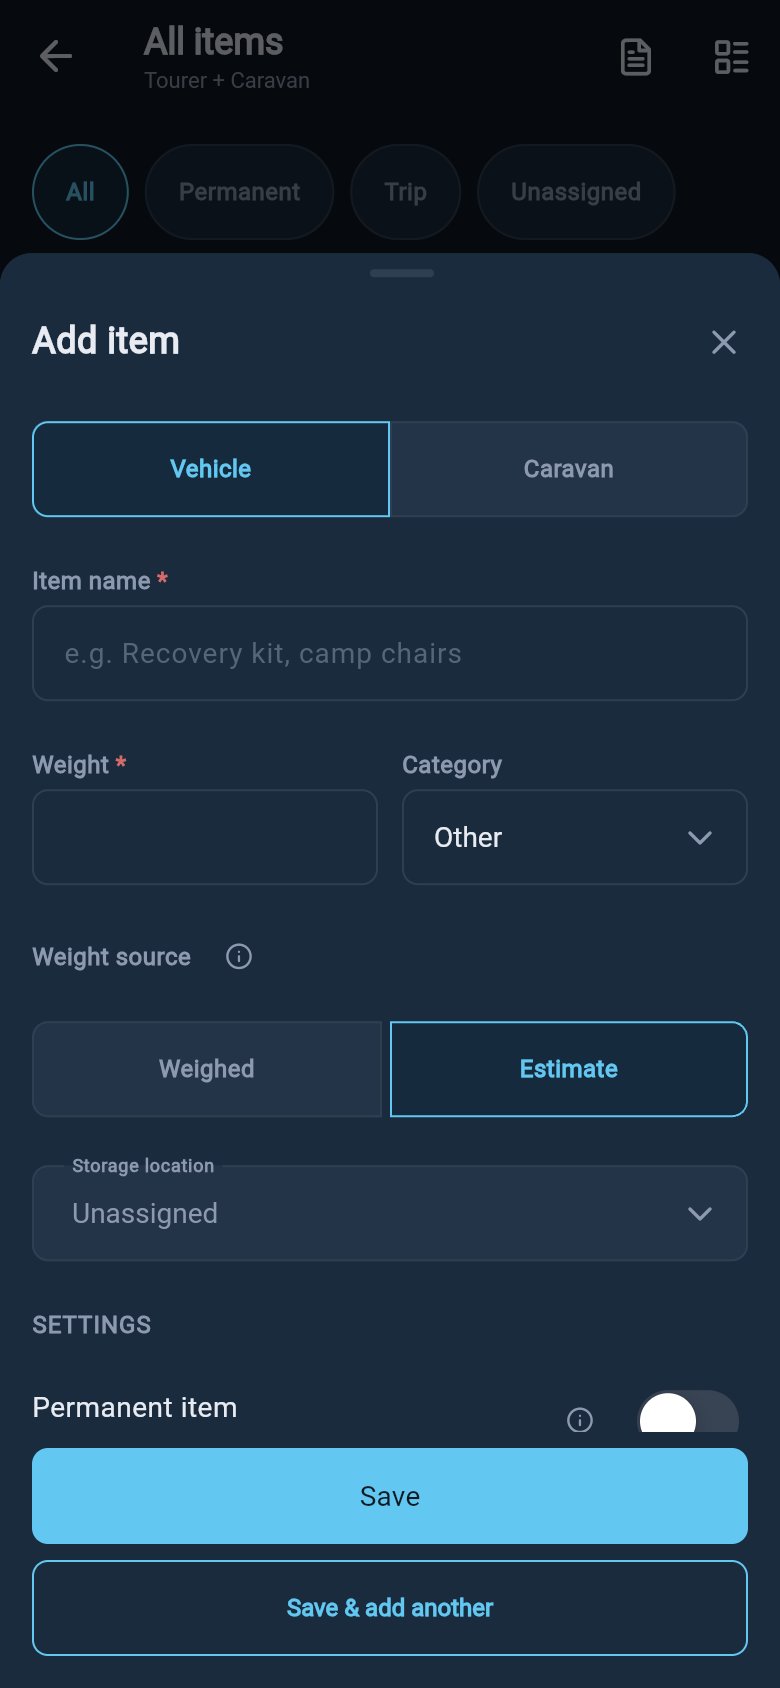
- Item name — give the load a name you will recognise, such as recovery kit, generator, or rear drawers.
- Weight and Category — enter the best weight you have and pick a category. For a consumable, the weight field is filled in for you from the consumable section below.
- Weight source — choose Weighed or Estimate. Weighed values give the most accurate safety scores; record an estimate when you are working from a label or a careful guess, and refine it later. (Items pulled from a library may carry a Library source.)
- Storage location — pick the zone where the item sits, or leave it unassigned. The zone is what tells loadmate where the weight is.
- Permanent item — turn this on for gear that always travels, such as a fixed toolbox; leave it off for trip-only gear.
- Variable-weight item — turn this on for anything that changes weight as you travel. See the consumables detail below.
- Excluded from calculations — turn this on if you want the item recorded but kept out of compliance checks. Its weight will not count toward your limits.
- Notes — optional notes about the item.
- Attachments — add up to five photos or PDF files, such as a receipt or a spec sheet.
Variable-weight (consumable) items
Turning on Variable-weight item opens the consumable section. This is for anything whose weight changes between trips or during a trip.- What changes? — choose the kind: Water tank, Fridge or groceries, Gas bottle, Spare fuel / jerry can, or Other.
- Weight when full — the item’s weight at full capacity. This is required for a consumable.
- Fill level — tap Full, 3/4, 1/2, 1/4, or Empty. The calculated weight updates as you change it.
- Advanced — open this to enter an Empty item weight (the container’s own weight) for a more accurate result. This is optional; leave it out and loadmate works from the full weight and fill level alone.
Import from a spreadsheet
If you keep your gear in a spreadsheet, you can add many items at once by uploading a CSV or Excel file. Import is additive, so it works best into an empty or intended list, and it cannot set consumable fill levels. The full walkthrough — template columns, the preview screen, and the rules for what imports cleanly — lives on its own page:Import loads from a spreadsheet
Template columns, the preview screen, and the rules for what imports cleanly.
Pick an asset and zone, or leave unassigned
If your rig is hitched, choose whether the item sits on the tow vehicle or on the trailer or caravan, then pick the storage zone where it actually sits. The zone is what tells loadmate where the weight is, which is what lets it work out how weight sits across the axles and the coupling — the tow ball mass (nose weight in the UK, tongue weight in the US). Closer placement to the right axle gives a steadier, healthier setup. You do not have to place a load in a zone before you can save it. If you do not yet know where an item will sit, leave it unassigned. An unassigned load still counts toward your total weight, and you can move it into a zone later from your loads list. Until then, its weight cannot be distributed across your zones, so assign a zone once you know the position. To define the zones you place loads into, see Set up storage zones.Save and review your Rig Score
Save the load when the name, weight, and placement read the way you want. The item is now part of what loadmate measures, alongside everything else on the rig. Your Rig Score reflects the change the next time you open the Rig tab, rather than animating on the add sheet itself. Open the Rig tab to see the updated score and grades, and check your loads list to confirm the item landed in the zone you expected.The fuel your tow vehicle runs on is part of the vehicle’s baseline weight, not a load item. Add loads for the gear, people, and consumables you carry, and leave the vehicle fuel tank to the vehicle setup. Portable items such as a spare jerry can are loads and can be added here.
Water and consumables
Consumables that change weight as you travel, such as water tanks and gas bottles.
Load changes
Review what has changed on your rig since your last weigh-in.
Load library
Which details travel with a saved item and which are specific to the trip.
Import loads
Add many items at once from a CSV or Excel file.