How the breakdown sheet reads
When you tap a grade cell, the sheet opens to that category. At the top it repeats the score gauge and the confidence badge, with a How is this calculated? link if you want the plain-English explanation. Below that, the category’s checks are listed as rows. Each row is one check. It shows the check’s name and a colour that matches the band colours on the gauge: green for healthy, amber for borderline, red for a problem, and grey when there is no data to read it yet. Tap a row to expand it for the current reading and what it means for your setup. Where a check has no data, it reads as a missing input rather than a low grade, so an empty row is a prompt to add something, not a mark against you.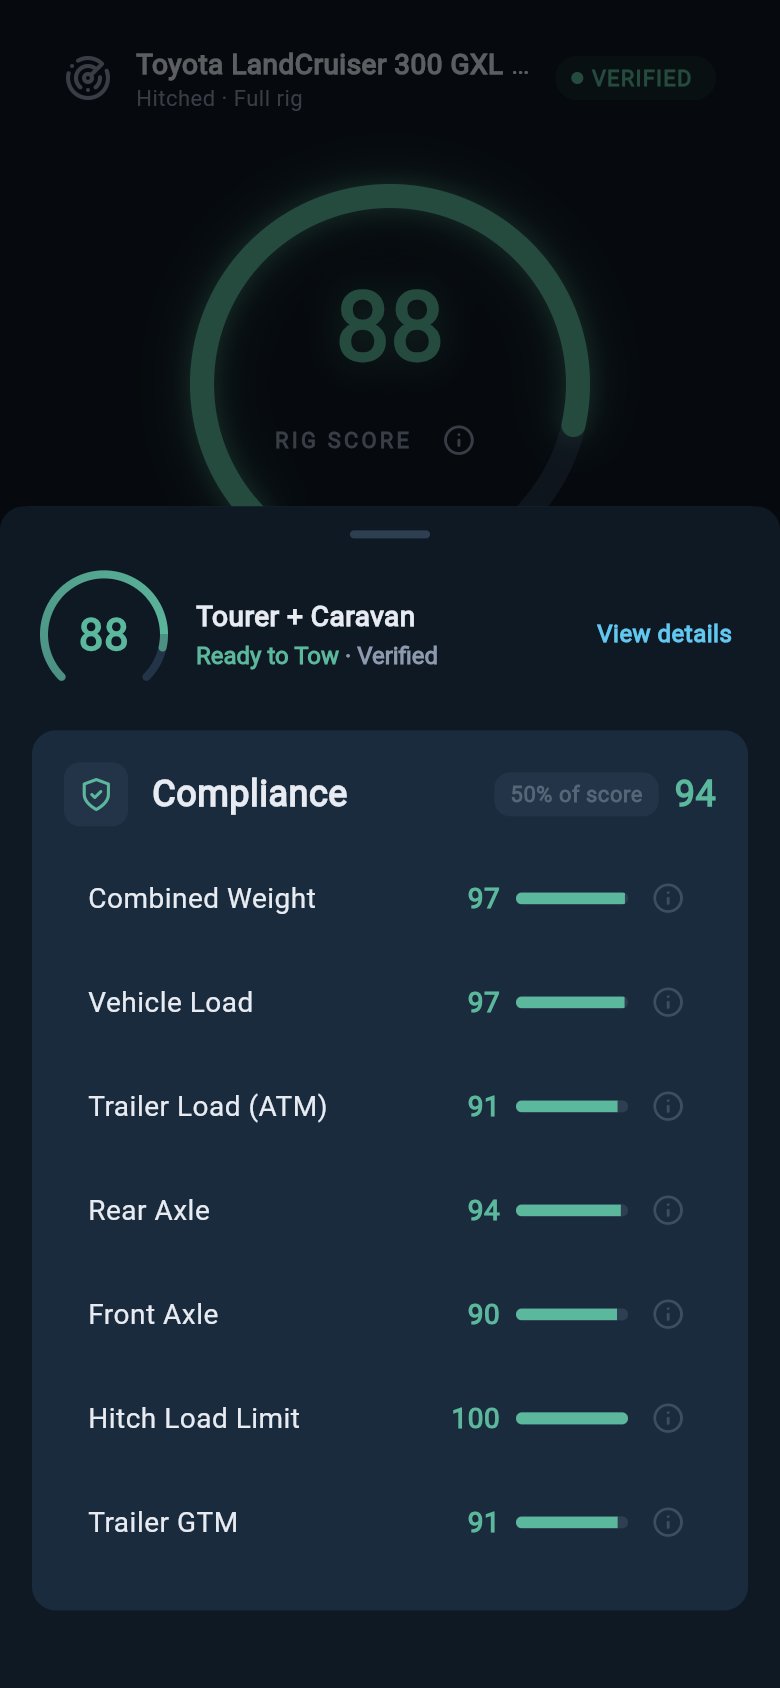
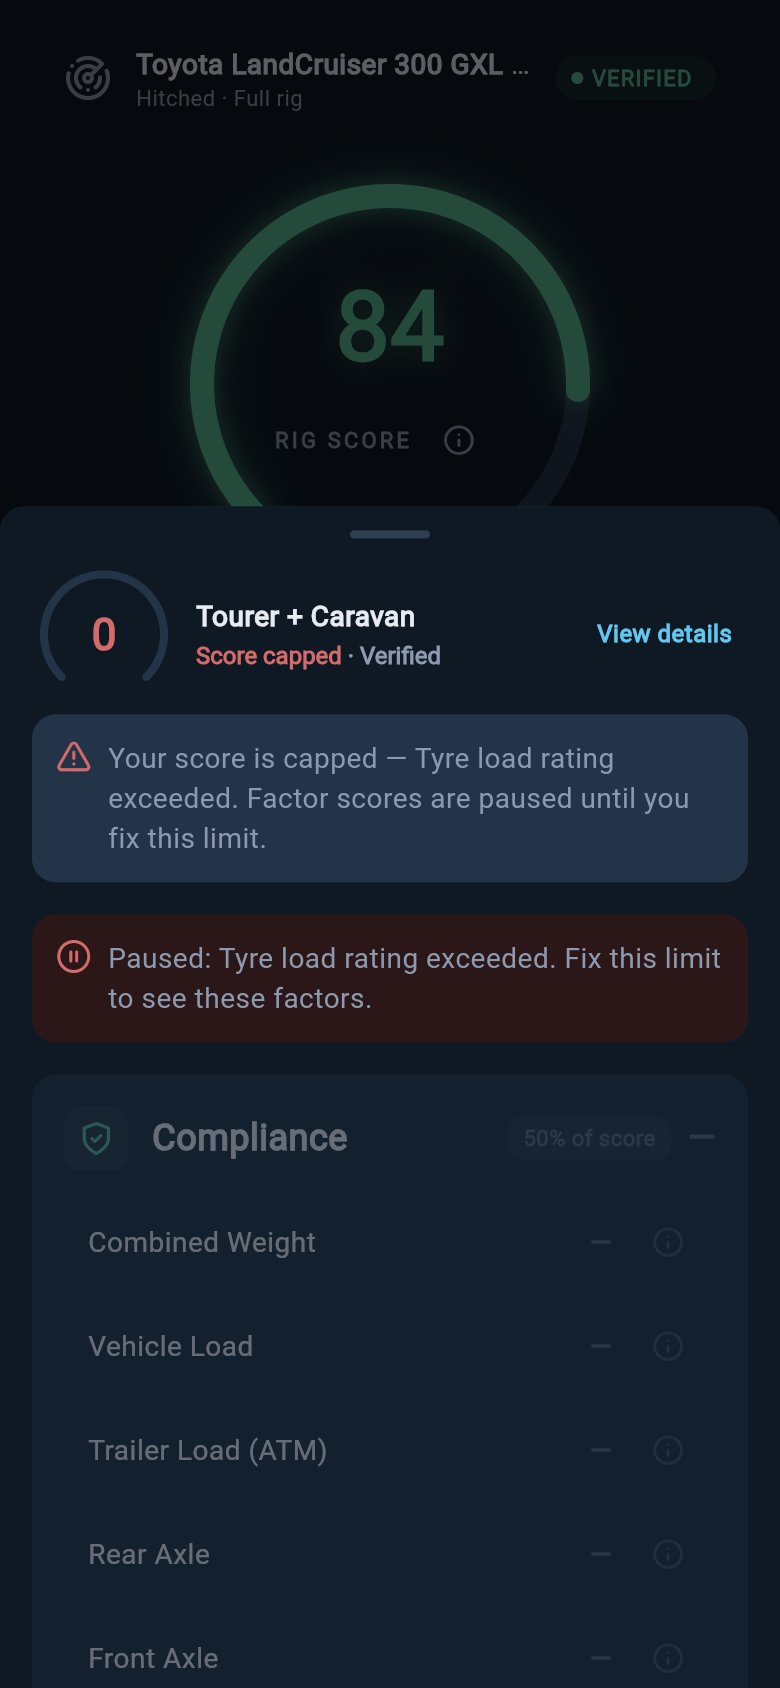
Capped is not the same as locked
These two states look similar on the gauge, but they mean opposite things, so it is worth being clear which one you are seeing. Capped means loadmate has your data, and that data shows a hard limit has been broken. The rig is over a weight limit, an axle rating, a towing capacity, a tyre’s rated load, or its coupling weight is dangerously low or high. This is a danger reading, not a low grade. The gauge reads Score Capped in red, a red alert at the top names the limit, and the breakdown rows below are paused — they show a dash instead of a grade so a good reading elsewhere cannot soften the warning. No amount of good news makes an overloaded rig safe to tow, so the score refuses to average it away. Clear the named limit and the score returns to its normal reading. Locked means the opposite: loadmate does not have enough data yet to score at all, so it shows Incomplete Setup instead of a number. Nothing is wrong with the rig; the app simply will not show a figure it cannot stand behind. It names what to add and points you to the screen for each item. For the locked state and what unlocks it, see What is the Rig Score. The limits that cap the score are: over your combined weight limit (GCM / Gross Train Weight / GCWR), over your vehicle’s weight limit (GVM / MAM / GVWR), over your trailer’s weight limit (ATM / MTPLM / Trailer GVWR / GTWR), over an axle rating, over your braked towing capacity, over your tyres’ rated load, or a coupling weight (tow ball mass / nose weight / tongue weight / coupling load) that is critically low or high.Compliance
Compliance is the legal floor: how much room you have under each weight limit. Each check compares a loaded weight against a limit you entered from the plate, and the closer you sit to a limit, the faster that check drops. For each one, the plain reading comes first, then why that limit matters once you are moving. When hitched, it reads:- Combined Weight — the tow vehicle and trailer together against the pair’s limit (GCM / Gross Train Weight / GCWR). Why it matters: this is the total mass your brakes, engine, and cooling have to manage. The less room here, the longer it takes to stop and the harder things work on a long climb.
- Vehicle Load — your loaded tow vehicle against its limit (GVM / MAM / GVWR). Why it matters: this is what the tow vehicle’s own suspension, brakes, and tyres carry before the trailer is even counted. Overload it and the parts that steer and stop you are working past their design.
- Trailer Load — your loaded trailer against its limit (ATM / MTPLM / Trailer GVWR / GTWR). Why it matters: the trailer’s axles, tyres, and chassis are rated for this weight. Past it, a tyre or axle is the most likely thing to give out at speed.
- Rear Axle and Front Axle — the weight on each axle against what that axle is rated to carry. Why it matters: an overloaded axle overworks its tyres and bearings and changes how that end of the rig brakes and grips. Balanced axles keep braking and steering even.
- Hitch Load Limit — the down-weight on the coupling against the hardware limit, shown as tow ball mass, nose weight, or tongue weight for your region. Why it matters: the coupling and the vehicle’s rear suspension are rated for a set down-weight. Past it, you are leaning on parts beyond what they are built to hold.
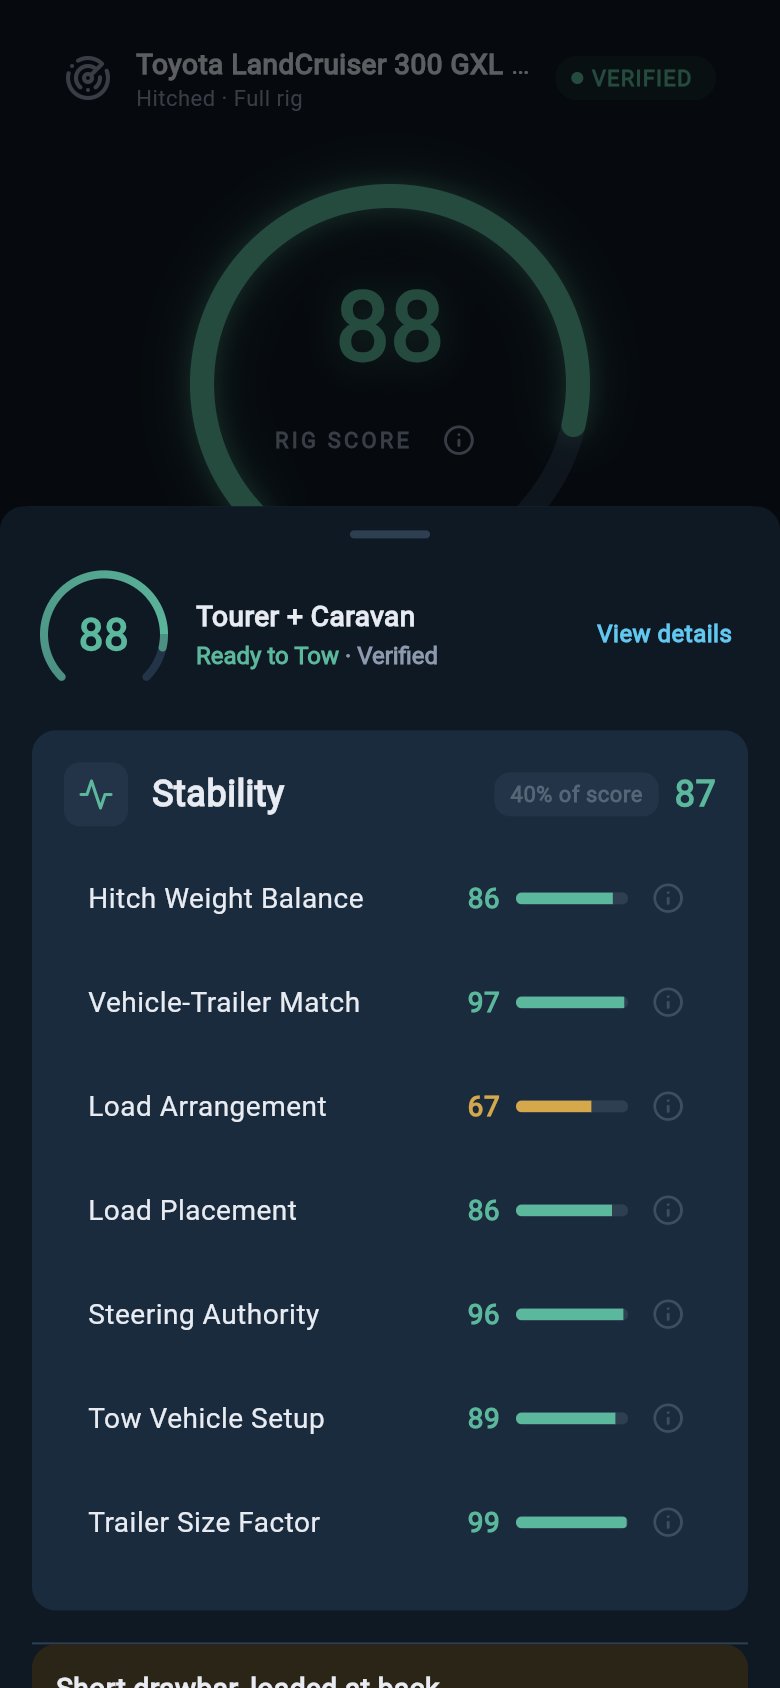
Stability
Stability is how the connected rig behaves once it is moving. A rig can pass every weight limit and still read low here, because handling is about where the weight sits, not just how much. Each check below is followed by the feel of it on the road:- Hitch Weight Balance — whether the coupling weight is a healthy share of the trailer’s weight, inside the ideal range for your region. Why it matters: too little weight on the ball lets a tail-heavy trailer wag the car and start to sway; too much lifts the front and dulls the steering. There is a sweet spot in between.
- Vehicle-Trailer Match — whether the tow vehicle is heavy enough for the trailer it is pulling. Why it matters: a trailer that out-weighs its tow vehicle is far more likely to push the car around in a crosswind or an emergency swerve, instead of the car staying in charge.
- Load Arrangement — whether the load is kept low and concentrated near the axles rather than stacked high or pushed to the ends. Why it matters: weight out at the ends swings like a pendulum and feeds any sway; weight low and over the axles stays calm.
- Load Placement — whether individual items are sitting too far from the axle group. Why it matters: a single heavy item at the extreme front or back, especially the back, can unsettle the whole rig even when the totals look fine.
- Steering Authority — whether coupling weight has lightened the front axle enough to affect steering. Why it matters: if the nose weight lifts the vehicle’s front too much, there is less grip on the wheels that steer, and the car responds vaguely just when you need it most.
- Tow Vehicle Setup — whether the wheelbase and rear overhang suit the trailer. Why it matters: a tow ball far behind the rear axle on a short wheelbase makes a longer lever, and that lever magnifies every sway. It is mostly fixed by the vehicle, so it guides which trailer suits it.
- Trailer Size Factor — whether the trailer’s length adds leverage that works against stability. Why it matters: a long trailer, particularly with a short drawbar, is more sway-prone, so it needs its weight kept central and low.
A good hitch weight reading on its own does not earn a strong stability grade. If the load is badly placed, stability is held down anyway, because the right amount of weight on the ball cannot make up for heavy gear sitting in the wrong place. The breakdown reads them together so a tidy ball figure cannot hide a poorly packed trailer.
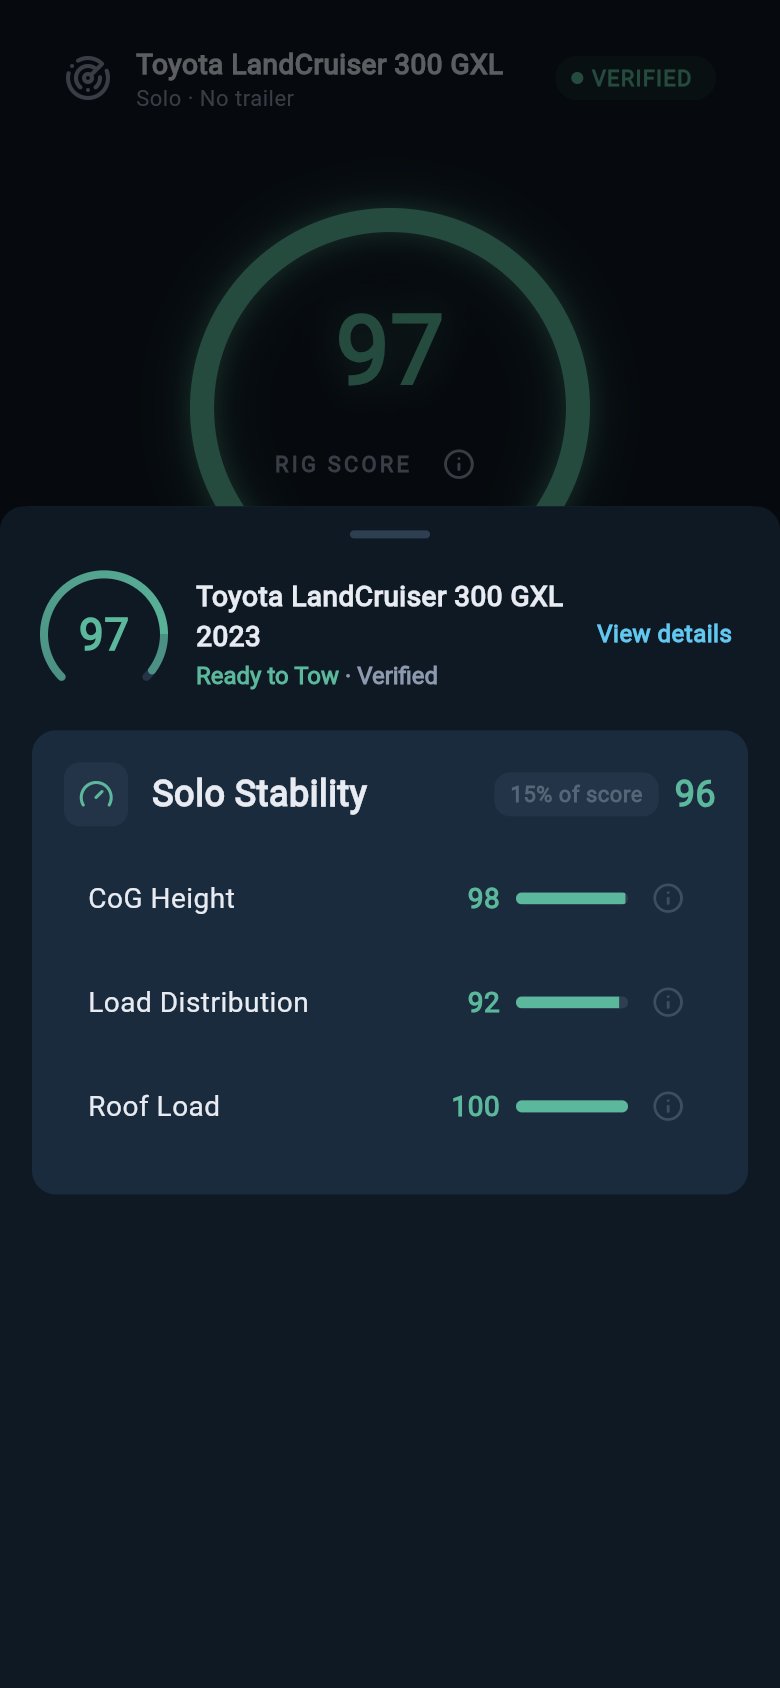
Solo stability
When you are not towing, the second category becomes Solo Stability and reads the vehicle on its own:- Centre of Gravity — how high your gear sits in the vehicle. Why it matters: a tall, top-heavy load raises the risk of tipping in a swerve or a quick roundabout. The lower the weight sits, the steadier the vehicle leans.
- Load Distribution — how weight is spread between the front and rear axles. Why it matters: too much over either end upsets the balance between braking and steering, so the vehicle stops and turns evenly when weight is shared.
- Roof Load — the proportion of weight carried up on the roof. Why it matters: the roof is the worst place for weight, because it lifts the centre of gravity most and hurts both handling and fuel use. Heavy gear belongs inside and low.
Health
Health covers upkeep, and it counts in both solo and hitched modes:- Service Status — how your next service sits against its schedule, by date and by odometer. Why it matters: brakes, bearings, and fluids are exactly the parts that work hardest under towing strain, so an overdue service is felt most when you are loaded and on a hill.
- Tyre condition — the age and load rating of your tyres. Why it matters: rubber hardens and cracks with age no matter how much tread is left, and an overloaded tyre overheats — both end in a blowout, the most common cause of towing trouble. Entering the manufacture dates from the sidewalls is what lets this check read the tyres you actually run.
Confidence
Confidence is the one category that does not sit in the breakdown rows. It is the badge at the top of the sheet, and it scales the whole displayed number rather than adding points to it. Why it matters: a score built on guessed weights would be a false comfort. When loadmate is less sure of your figures, it shows a lower number honestly rather than a high one with a quiet caveat — so the number you read is one you can act on. The badge reads three things: the strength of your baseline (a professional weigh-in is the strongest, a factory figure the weakest), how complete your data is, and how far the rig may have drifted since its last weigh-in. When confidence is low, the displayed score is pulled down honestly so it does not pretend to know more than it does. As you add real data, the badge climbs and the number lifts with it. Tapping the Confidence cell opens its own breakdown with the highest-impact things you can add next — usually a weigh-in. For what each badge word means, see What is the Rig Score, which is the one place that defines the confidence badge.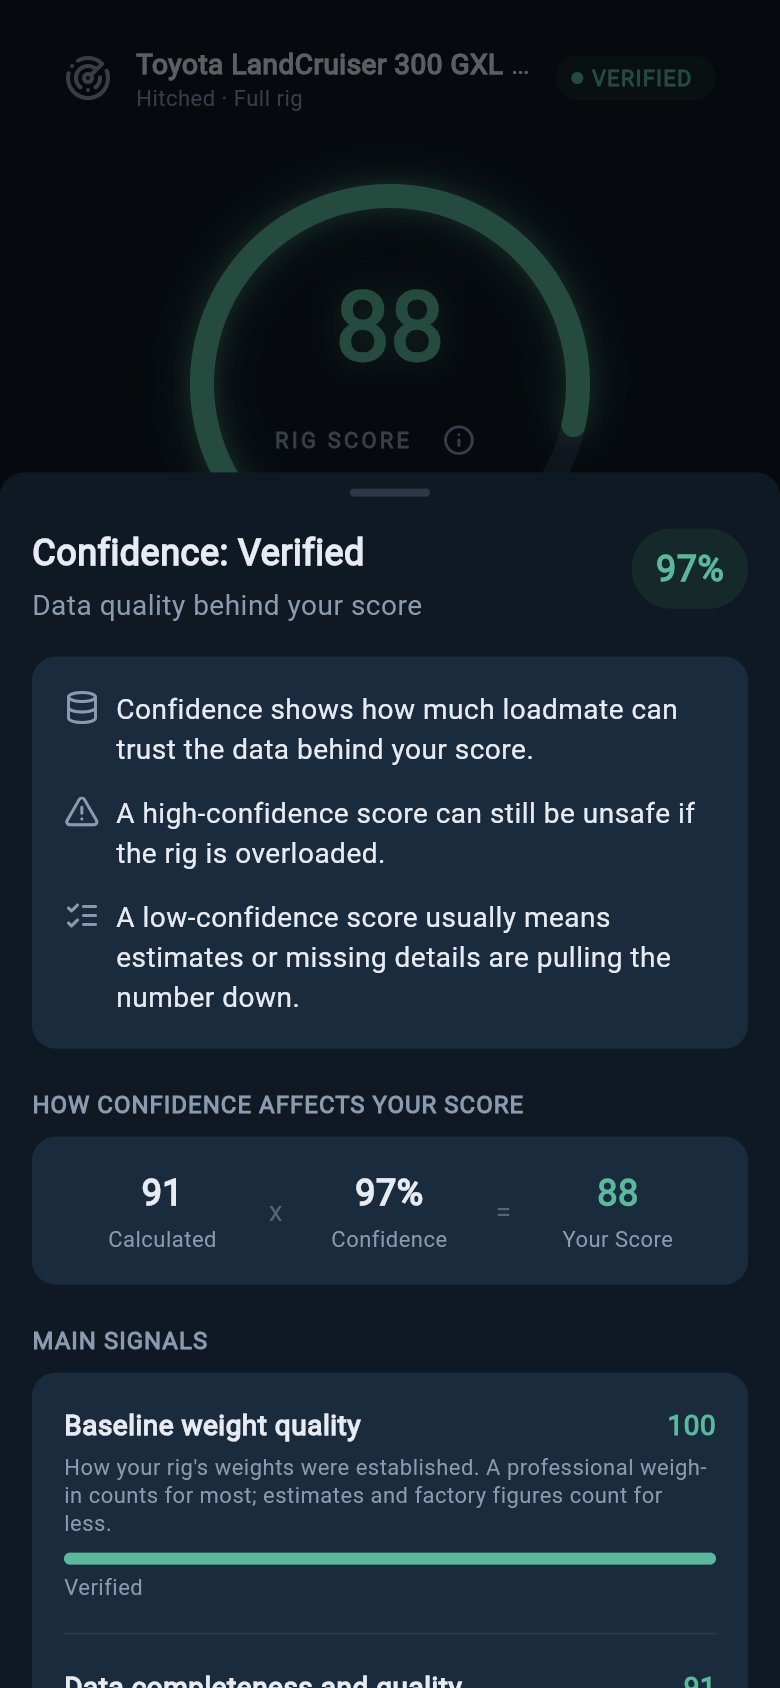
Findings
Below the category rows, the sheet can show findings: short notes that combine more than one check into a single, plain-language issue, such as a high centre of gravity paired with a rear-loaded trailer. Each finding names the problem and the action that addresses it, so a pattern spread across several checks reads as one clear next step.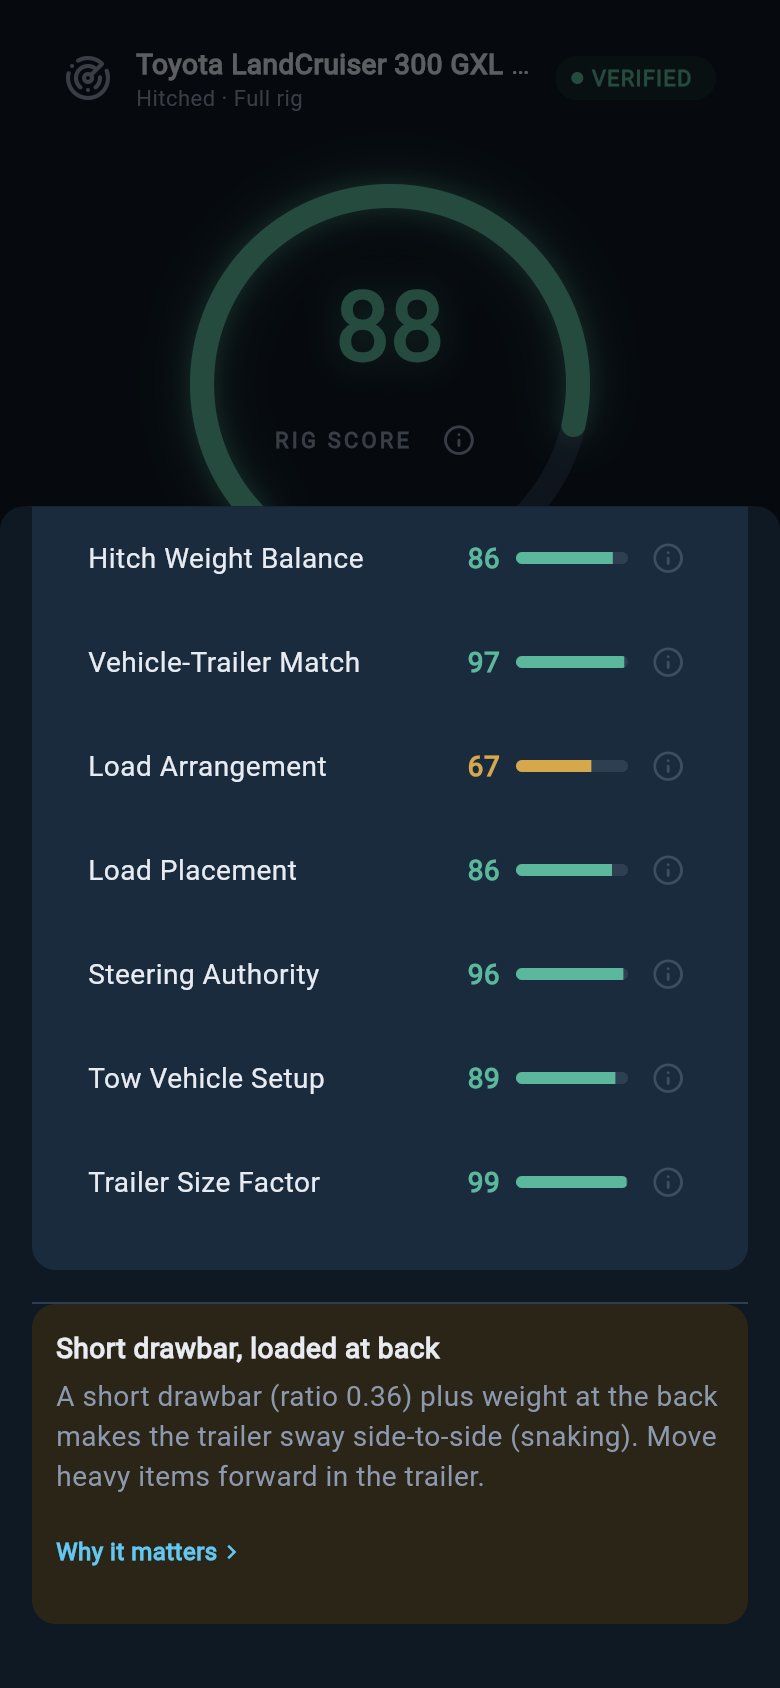
Reading versus changing
The breakdown is part of the score, so reading it is just part of using the Rig tab. The fixes you reach from it are the real work: moving a load, editing a rating, logging a service, saving tyre dates, or recording a weigh-in. When you are ready to act on what the breakdown shows, Improve your score works through the changes that lift each category. If the score moved on its own and you want to know why, see My Rig Score changed - why?. For any towing term you are unsure of — tow ball mass, GVM, ATM, GCM and their UK and US equivalents — the Glossary has the plain meaning.loadmate helps you work from the numbers you enter. Keep your source documents handy, and use a weighbridge, truck scale, or local authority when you need official evidence.