> ## Documentation Index
> Fetch the complete documentation index at: https://docs.loadmate.io/llms.txt
> Use this file to discover all available pages before exploring further.
# Plan a trip
> Plan a trip in loadmate by setting a destination, dates, route shape, stops, and the rig you tow, so the pre-trip checklist can flag what needs attention.
Planning a trip is not really about the route. You tell loadmate three things: **where** you are going, **when**, and **which rig** you are taking. With those in hand, the pre-trip checklist can start listing what needs attention a few days before you leave, while there is still time to fix it.
Everything else on the form is optional. Set the destination, the dates, and the rig, and you have done the part that matters.
The new-trip form opens for everyone, so you can see exactly what it asks for. **Saving** a trip to your own rig needs Pro, and demo data is read-only — you can look around a demo trip but not save changes to it.
## Open the new-trip form
Open the **Trips** tab from the bottom of the screen. Your upcoming and completed trips are listed there. To start a new one, tap **Add**, the button with the plus sign near the bottom of the list.
There is no "what kind of trip?" question first. Tapping **Add** takes you straight into the planning form. On a phone it slides up from the bottom of the screen. On a tablet or a wide window it opens as a panel in the middle. Either way it asks for the same things, in the same order.
The form is headed **Planned trip**. A planned trip is one with a destination and dates. That is the kind loadmate uses to check your readiness before you set off.
## Set the destination and dates
These are the two things loadmate really needs. Once it knows where you are headed and how long you will be away, it can work out which checks matter and roughly how far you are going.
In the **Where are you going?** field, start typing the town, park, or place. As you type, loadmate offers matching suggestions. Tap the right one and the address fills itself in. Choosing a suggestion, rather than typing free text, is what later lets loadmate sketch the route and work out the distance.
Tap **Leaving** to choose the day you set off, and **Returning** to choose the day you get home. Both are needed. The pre-trip checklist uses that window to decide what to watch: a service that falls due while you are away, say, or a tyre that crosses an age warning before you return. The **Returning** date cannot fall before the **Leaving** date. loadmate will ask you to fix the order if it does.
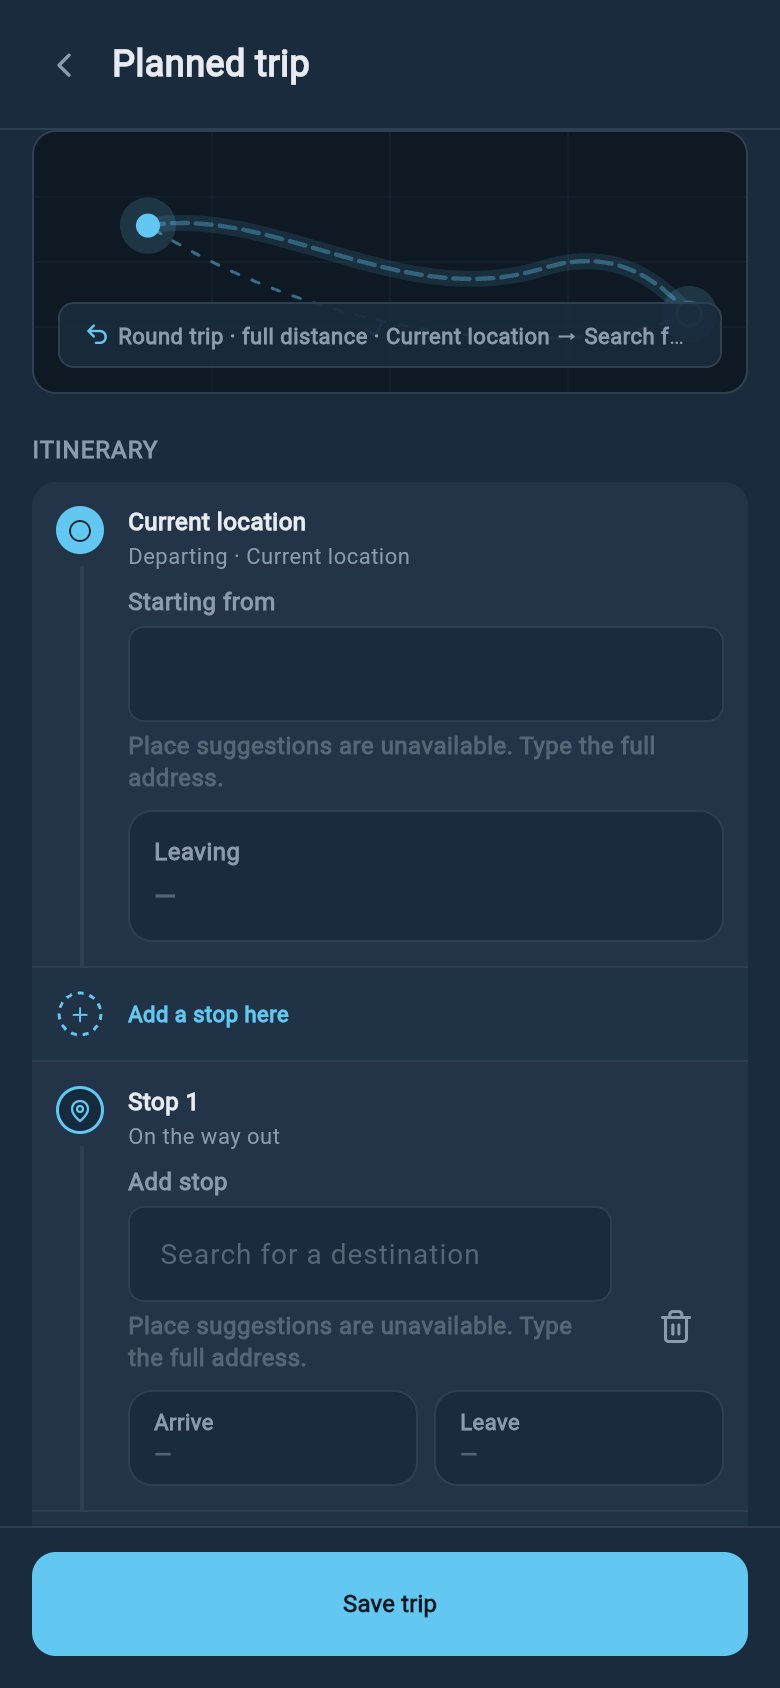
By default loadmate departs from **Current location**. If you are setting off from somewhere else, such as a friend's place or a storage yard, open **Starting from** and type the starting point. Leave it alone and loadmate assumes you are leaving from where you are now.
You can also give the **main destination** its own **Arrive** and **Leave** dates if you want loadmate to know how long you are staying there. These are optional, and both must sit inside your leaving and returning window.
## Choose the route shape
Under the destination, loadmate shows a small callout describing the shape of your trip, such as *Round trip — returns to home*, with a **Change** link beside it. Tap **Change** to open the shape picker. There are three shapes to choose from:
You travel out to your destination and come **back to where you started**. This is the everyday holiday shape: home to the coast and home again. loadmate measures the full there-and-back distance.
Your **destination is the final stop**. You are not planning a return on this trip. This suits a relocation, a delivery run, or a trip whose return you will plan separately. loadmate measures the outbound distance only.
You come home, but to a **different return place** than where you started, or by a different road. Choose a **Return to** location. You can add stops on the way home as well as on the way out, which is handy for a circuit where the run home is its own part of the trip.
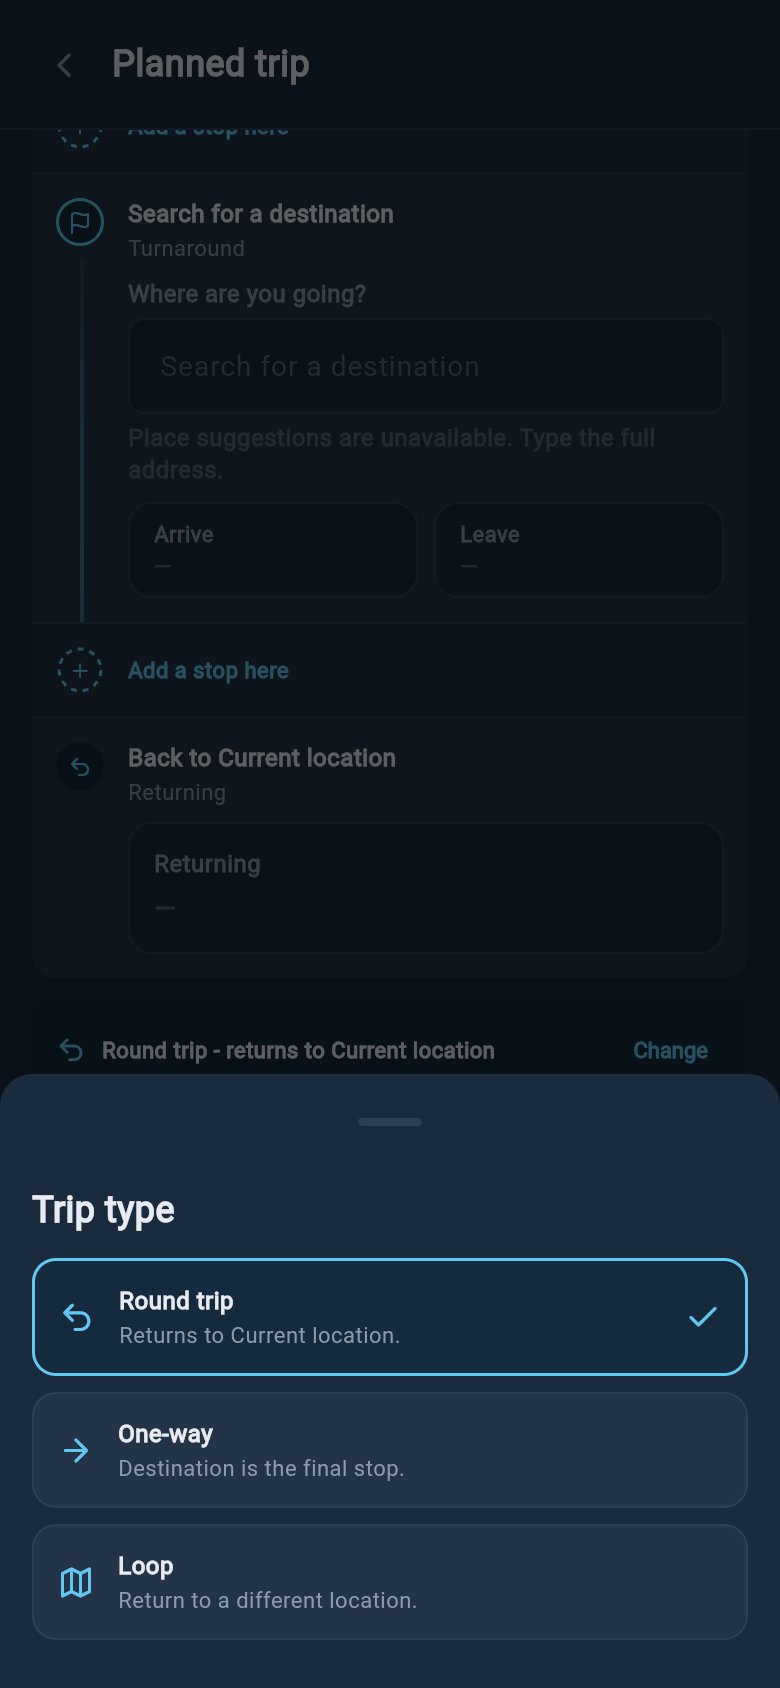 You can switch the shape at any time while you are filling in the form. Changing it only affects how loadmate draws and measures the route. It does not lose the destination or dates you have already entered. Switching away from Loop simply drops the separate return place.
## Add stops along the way
If your trip has stops between home and your destination, add them as **stops** so the route reflects the real drive. A stop might be an overnight halt, a town to fuel up and stretch, or a relative to visit.
Tap **Add stop** and type the place. You will also see **Add a stop here** between points on the timeline. As with the destination, the suggestions help you land on the right spot.
Each stop can carry its own **Arrive** and **Leave** dates, so loadmate knows roughly when you will be where. These dates must sit inside your trip window, between your **Leaving** and **Returning** dates, and a stop's **Leave** cannot be before its **Arrive**. loadmate will gently point out any date that does not fit.
Tap a stop to change its place or dates. Tap the bin icon to remove it if your plans change. Add as many as your trip needs.
For a **Loop** trip, you can add stops on the way home as well, so a circuit reads as one continuous trip rather than two separate ones.
You can switch the shape at any time while you are filling in the form. Changing it only affects how loadmate draws and measures the route. It does not lose the destination or dates you have already entered. Switching away from Loop simply drops the separate return place.
## Add stops along the way
If your trip has stops between home and your destination, add them as **stops** so the route reflects the real drive. A stop might be an overnight halt, a town to fuel up and stretch, or a relative to visit.
Tap **Add stop** and type the place. You will also see **Add a stop here** between points on the timeline. As with the destination, the suggestions help you land on the right spot.
Each stop can carry its own **Arrive** and **Leave** dates, so loadmate knows roughly when you will be where. These dates must sit inside your trip window, between your **Leaving** and **Returning** dates, and a stop's **Leave** cannot be before its **Arrive**. loadmate will gently point out any date that does not fit.
Tap a stop to change its place or dates. Tap the bin icon to remove it if your plans change. Add as many as your trip needs.
For a **Loop** trip, you can add stops on the way home as well, so a circuit reads as one continuous trip rather than two separate ones.
 ## Choose the rig you are taking
This is the quiet but important one. Your **rig** is the tow vehicle paired with the trailer or caravan you are towing: the exact setup you will have on the road. The form shows it on a **Configuration** row near the bottom.
If you only have one rig, it is already chosen and you can move on. If you have more than one vehicle or trailer, tap **Change** on that row to open **Choose trip rig** and pick the pairing you will actually tow. This matters because the pre-trip checklist reads from that exact rig, not from every asset in your garage. Your weights, your loads, your score, and your tyre and service status all come from the rig you choose here.
For those checks to be worth trusting, it helps to make the chosen rig **current** before you lean on it. None of this happens on the trip form. It lives on the rig itself. A quick pass now saves surprises later:
Add, remove, or adjust gear so your load list reflects this trip.
Set fill levels for tanks and bottles so the weight is realistic.
Add manufacture dates and load ratings so the tyre checks can read.
A fresh weighbridge or scale reading lifts the confidence in every number.
You do not have to do all of that before you can save the trip. The trip will still save without it. But the more current the rig, the more the pre-trip checklist can tell you before you leave.
## Add notes and photos
If you want to keep trip details in one place, open **Add more details** near the bottom of the form. There you will find:
* **Notes** — a free-text field for anything you want to remember: a campground booking reference, a gate code, who you are meeting, what time check-in is.
* **Attachments** — tap **Add files** to attach up to five photos, such as a snapshot of a booking confirmation or a map you saved.
Both are optional. They travel with the trip, so the details are there when you open it again on the road, days later.
## Distance and the route map
loadmate draws a small **route preview** that updates as you add the destination, the stops, and the route shape, so you can watch the trip take shape at a glance. This preview is a simple sketch, not a street map. It is just there to show the order of your stops.
Once the trip is saved, loadmate works out the **distance** for the route and fetches a small **route map** from Google. The map appears on the trip alongside a rough drive estimate. It is a picture of the route and a distance figure, a calm reference rather than a live map.
loadmate is **not** a navigation app. It will not give you turn-by-turn directions. For the driving itself, keep using the navigation you already trust, whether that is your phone maps, a dedicated sat-nav, or your in-car system. loadmate's job is to tell you where you are going, how far it is, and what still needs attention before you set off.
## After you save
Tap **Save trip** when the destination, dates, and rig read the way you want.
The trip lands in your list on the **Trips** tab, under your upcoming trips. From there it sits quietly until departure draws near. The active checks begin about two weeks before you leave, and that is when the **readiness** checklist comes to life. Readiness is a short pre-departure list. It fills itself in as your leaving date approaches, showing what needs attention while there is still time to act. It shows a plain **count**, such as *3 pre-trip checks pending*, or **No outstanding checks** when you are clear. There is no score and no progress bar, so it never feels like a test.
Readiness combines two things. First, items tied to your trip window: a service or warranty falling due while you are away, or a tyre crossing an age threshold by your return. Second, a few current findings from your chosen rig that matter before departure. It is not a safety score. Your Rig Score is shown separately on the Rig tab. For the full list of what can appear, see [The pre-trip checklist](/pre-trip/checklist).
Open the trip from your list to edit its dates, destination, stops, notes, or rig. You can also duplicate a trip to reuse it as a starting point, or cancel and delete one that is no longer happening. Editing the dates can shift which readiness items appear, because the window has moved. After a change, reopen the trip and glance at the checklist again. Starting, logging changes during, and finishing a trip are all covered on [During your trip](/trips/during-your-trip).
This page is about planning. Walking out to the van and checking the hitch, the lights, the load straps, and the tyres before you pull away is still your own job. It is a habit worth keeping whatever the app says. loadmate prepares you from the information you have entered. It does not replace the look around your own rig.
**Try it now:** open the **Trips** tab and tap **Add**. Type your next destination and set your leaving and returning dates — even just those two fields show you how the pre-trip checklist starts to take shape.
For the trips list, your travel stats, and where everything lands, see [Your trips list and stats](/trips/trip-list-and-stats). For what readiness can flag before you leave, see [The pre-trip checklist](/pre-trip/checklist).
## Choose the rig you are taking
This is the quiet but important one. Your **rig** is the tow vehicle paired with the trailer or caravan you are towing: the exact setup you will have on the road. The form shows it on a **Configuration** row near the bottom.
If you only have one rig, it is already chosen and you can move on. If you have more than one vehicle or trailer, tap **Change** on that row to open **Choose trip rig** and pick the pairing you will actually tow. This matters because the pre-trip checklist reads from that exact rig, not from every asset in your garage. Your weights, your loads, your score, and your tyre and service status all come from the rig you choose here.
For those checks to be worth trusting, it helps to make the chosen rig **current** before you lean on it. None of this happens on the trip form. It lives on the rig itself. A quick pass now saves surprises later:
Add, remove, or adjust gear so your load list reflects this trip.
Set fill levels for tanks and bottles so the weight is realistic.
Add manufacture dates and load ratings so the tyre checks can read.
A fresh weighbridge or scale reading lifts the confidence in every number.
You do not have to do all of that before you can save the trip. The trip will still save without it. But the more current the rig, the more the pre-trip checklist can tell you before you leave.
## Add notes and photos
If you want to keep trip details in one place, open **Add more details** near the bottom of the form. There you will find:
* **Notes** — a free-text field for anything you want to remember: a campground booking reference, a gate code, who you are meeting, what time check-in is.
* **Attachments** — tap **Add files** to attach up to five photos, such as a snapshot of a booking confirmation or a map you saved.
Both are optional. They travel with the trip, so the details are there when you open it again on the road, days later.
## Distance and the route map
loadmate draws a small **route preview** that updates as you add the destination, the stops, and the route shape, so you can watch the trip take shape at a glance. This preview is a simple sketch, not a street map. It is just there to show the order of your stops.
Once the trip is saved, loadmate works out the **distance** for the route and fetches a small **route map** from Google. The map appears on the trip alongside a rough drive estimate. It is a picture of the route and a distance figure, a calm reference rather than a live map.
loadmate is **not** a navigation app. It will not give you turn-by-turn directions. For the driving itself, keep using the navigation you already trust, whether that is your phone maps, a dedicated sat-nav, or your in-car system. loadmate's job is to tell you where you are going, how far it is, and what still needs attention before you set off.
## After you save
Tap **Save trip** when the destination, dates, and rig read the way you want.
The trip lands in your list on the **Trips** tab, under your upcoming trips. From there it sits quietly until departure draws near. The active checks begin about two weeks before you leave, and that is when the **readiness** checklist comes to life. Readiness is a short pre-departure list. It fills itself in as your leaving date approaches, showing what needs attention while there is still time to act. It shows a plain **count**, such as *3 pre-trip checks pending*, or **No outstanding checks** when you are clear. There is no score and no progress bar, so it never feels like a test.
Readiness combines two things. First, items tied to your trip window: a service or warranty falling due while you are away, or a tyre crossing an age threshold by your return. Second, a few current findings from your chosen rig that matter before departure. It is not a safety score. Your Rig Score is shown separately on the Rig tab. For the full list of what can appear, see [The pre-trip checklist](/pre-trip/checklist).
Open the trip from your list to edit its dates, destination, stops, notes, or rig. You can also duplicate a trip to reuse it as a starting point, or cancel and delete one that is no longer happening. Editing the dates can shift which readiness items appear, because the window has moved. After a change, reopen the trip and glance at the checklist again. Starting, logging changes during, and finishing a trip are all covered on [During your trip](/trips/during-your-trip).
This page is about planning. Walking out to the van and checking the hitch, the lights, the load straps, and the tyres before you pull away is still your own job. It is a habit worth keeping whatever the app says. loadmate prepares you from the information you have entered. It does not replace the look around your own rig.
**Try it now:** open the **Trips** tab and tap **Add**. Type your next destination and set your leaving and returning dates — even just those two fields show you how the pre-trip checklist starts to take shape.
For the trips list, your travel stats, and where everything lands, see [Your trips list and stats](/trips/trip-list-and-stats). For what readiness can flag before you leave, see [The pre-trip checklist](/pre-trip/checklist).